Getting Started with IMTerm on Linux
IMTerm is a browser-based terminal emulator that supports TN5250E (AS/400 / IBM i), TN3270E (z/OS mainframe), and VT220/SSH connections. Unlike traditional desktop terminal emulators, IMTerm is a single Go binary that serves a web UI - your users connect with any modern browser, with no client software to install or maintain. This guide walks you through installation, basic configuration, and production deployment on Linux.
What You Need
- Linux x86_64 (RHEL, Fedora, Ubuntu, Debian, or any distribution with kernel 4.14+)
- 512 MB RAM for server mode; 256 MB for local/demo mode
- 50 MB disk for the binary and static assets
- For TN3270E (z/OS) connections:
s3270in PATH (dnf install x3270-textorapt-get install x3270) - A modern browser (Chrome, Firefox, Edge, or Safari) for the web UI
Step 1: Download IMTerm
Contact Infomanta sales at sales@infomanta.com to request the binary for your platform. You will receive one of:
imterm- static Linux x86_64 binary (tarball or direct)imterm-*.rpm- for Fedora / RHEL / SLESimterm-*.deb- for Ubuntu / Debianimterm.AppImage- universal Linux, no install required
For RPM-based systems:
sudo dnf install imterm-2.0.1-1.x86_64.rpm
For DEB-based systems:
sudo dpkg -i imterm_2.0.1_amd64.deb
For the tarball:
tar -xzf imterm-2.0.1-linux-amd64.tar.gz
sudo mv imterm /usr/local/bin/
chmod +x /usr/local/bin/imterm
Verify the installation:
imterm --version
# IMTerm v2.0.1 (abc1234) built 2026-06-27 with go1.22.4
Step 2: Run in Local Mode
Local mode is the fastest way to see IMTerm in action. It binds to 127.0.0.1 only and opens your default browser automatically:
imterm --local
Your browser opens to http://127.0.0.1:8080. You will see the IMTerm login screen:
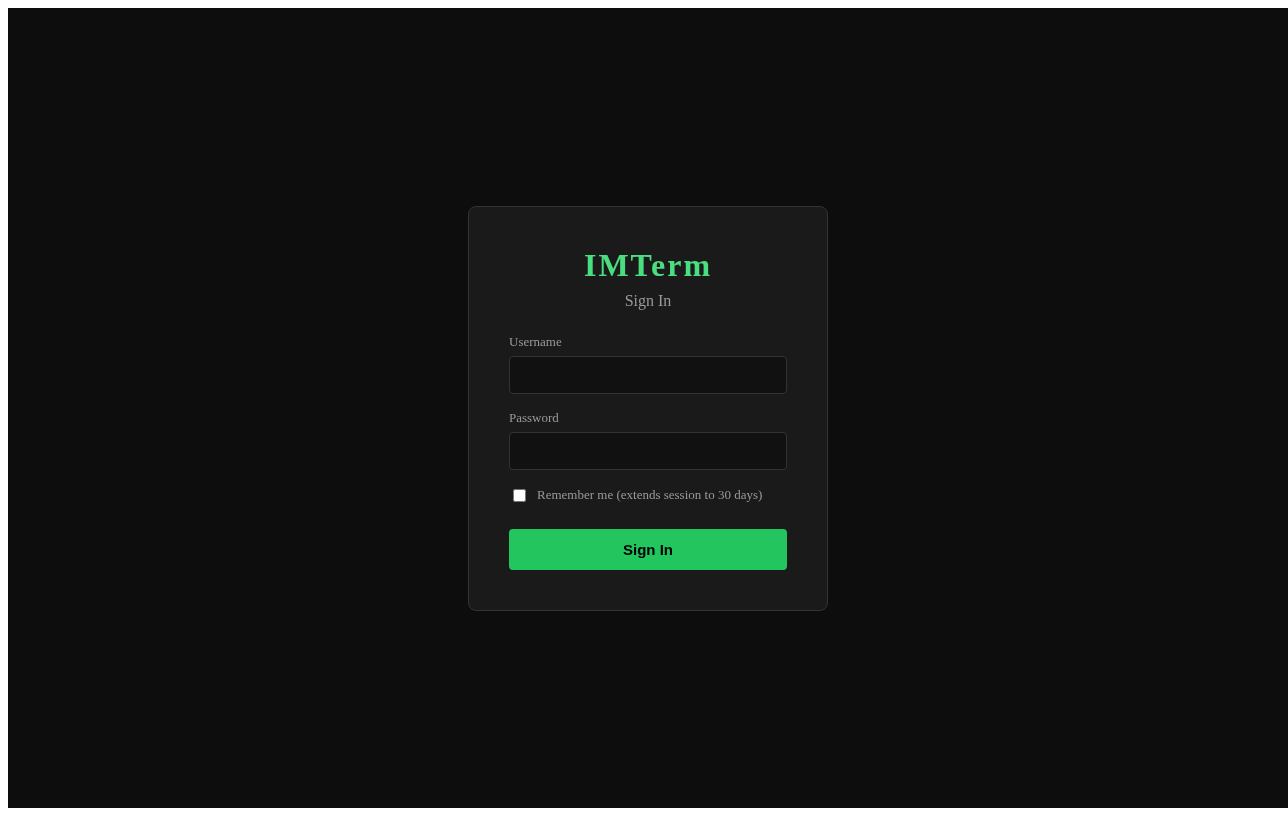
The default admin credentials for local mode are set via environment variables:
IMTERM_ADMIN_USER=admin IMTERM_ADMIN_PASS=changeme imterm --local
After logging in, click "New Connection" to open the connection dialog.
Step 3: Connect to Your First AS/400
Click "New Connection" and fill in the TN5250E profile:
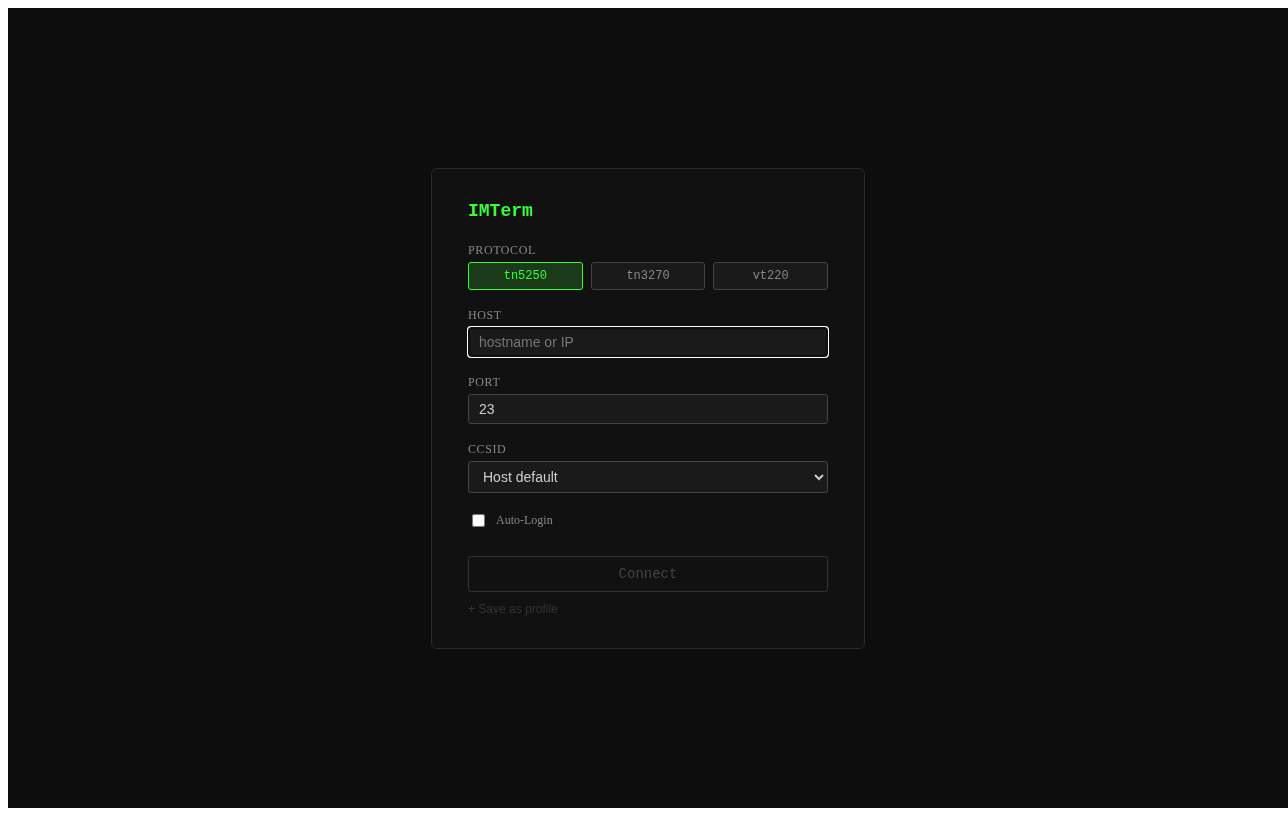
| Field | Value |
|---|---|
| Name | My AS/400 |
| Protocol | TN5250E |
| Host | as400.example.com |
| Port | 23 (or 992 for TLS) |
| CCSID | CP424 (Hebrew New) or CP037 (US English) |
| Terminal Type | IBM-3179-2 (24x80) or IBM-3477-FC (27x132) |
Click "Connect". For z/OS mainframe connections, select TN3270E instead - this requires s3270 in your PATH:
# Fedora/RHEL
sudo dnf install x3270-text

# Ubuntu/Debian
sudo apt-get install x3270
Step 4: Deploy in Server Mode
For a production deployment where multiple users share one IMTerm server, run in server mode:
imterm --addr 0.0.0.0:8080 --data-dir /var/lib/imterm
All users open http://your-server:8080 in their browser - no installation on client machines.
The --data-dir flag sets where IMTerm stores user accounts, audit logs, and session recordings. Use a persistent path.
Step 5: Configure with config.yaml
Generate an annotated sample configuration:
imterm --generate-config > /etc/imterm/config.yaml
Edit the key settings:
# /etc/imterm/config.yaml

# Listen address for the HTTP server.
addr: "0.0.0.0:8080"

# Data directory: users, audit log, recordings.
data_dir: "/var/lib/imterm"

# Authentication mode: local | ldap | oidc | saml | kerberos
auth:
  mode: local

# TLS - strongly recommended in production.
# Alternatively, terminate TLS at nginx (recommended).
tls:
  cert: ""    # path to PEM certificate, e.g. /etc/imterm/tls.crt
  key: ""     # path to PEM private key,  e.g. /etc/imterm/tls.key

# Session limits.
max_sessions: 0    # 0 = unlimited (license enforces the actual cap)

# Idle timeout - disconnect inactive sessions automatically.
session_idle_timeout: "30m"

# Audit log.
audit:
  rotate: daily
  max_size_mb: 100
  keep_days: 365
All config keys can be overridden with environment variables using the prefix IMTERM_. For example:
export IMTERM_AUTH_MODE=ldap
export IMTERM_DATA_DIR=/mnt/nfs/imterm
Step 6: Set Up systemd Service
Generate a ready-to-use systemd unit file:
imterm --generate-systemd | sudo tee /etc/systemd/system/imterm.service
The generated unit file looks like this:
[Unit]
Description=IMTerm Terminal Emulator
After=network.target

[Service]
Type=simple
User=imterm
Group=imterm
ExecStart=/usr/local/bin/imterm --config /etc/imterm/config.yaml
Restart=on-failure
RestartSec=5
StandardOutput=journal
StandardError=journal
SyslogIdentifier=imterm
# Environment overrides (uncomment and set as needed):
# Environment=IMTERM_ADMIN_USER=admin
# Environment=IMTERM_ADMIN_PASS=changeme

[Install]
WantedBy=multi-user.target
Create the service user and enable the service:
# Create a dedicated service user
sudo useradd --system --no-create-home --shell /sbin/nologin imterm

# Create data and config directories
sudo mkdir -p /var/lib/imterm /etc/imterm
sudo chown imterm:imterm /var/lib/imterm

# Copy your config
sudo cp config.yaml /etc/imterm/config.yaml

# Enable and start
sudo systemctl daemon-reload
sudo systemctl enable imterm
sudo systemctl start imterm
sudo systemctl status imterm
Step 7: Add nginx Reverse Proxy (Recommended)
Running IMTerm behind nginx gives you TLS termination, HTTP/2, and WebSocket upgrade in one place:
# /etc/nginx/conf.d/imterm.conf
server {
    listen 443 ssl http2;
    server_name imterm.example.com;

    ssl_certificate     /etc/nginx/ssl/imterm.crt;
    ssl_certificate_key /etc/nginx/ssl/imterm.key;

    location / {
        proxy_pass http://127.0.0.1:8080;
        proxy_http_version 1.1;
        proxy_set_header Upgrade $http_upgrade;
        proxy_set_header Connection "upgrade";
        proxy_set_header Host $host;
        proxy_read_timeout 3600s;
    }
}
The Upgrade and Connection headers are essential - without them, WebSocket connections (which power the live terminal) will not work.
Reload nginx:
sudo nginx -t && sudo systemctl reload nginx
Step 8: Create the First Admin User
IMTerm creates the initial admin account from environment variables on first run. For subsequent users, use the CLI:
# Add a regular user
imterm user add --name alice --role user

# Add an admin
imterm user add --name bob --role admin

# List all users
imterm user list

# Reset a password
imterm user passwd --name alice
You can also manage users from the web UI at /admin (Admin role required).
Step 9: Test the Deployment
Open your browser to https://imterm.example.com. Log in with your admin credentials.
Create a connection profile for your AS/400. After connecting, you should see the AS/400 sign-on screen:
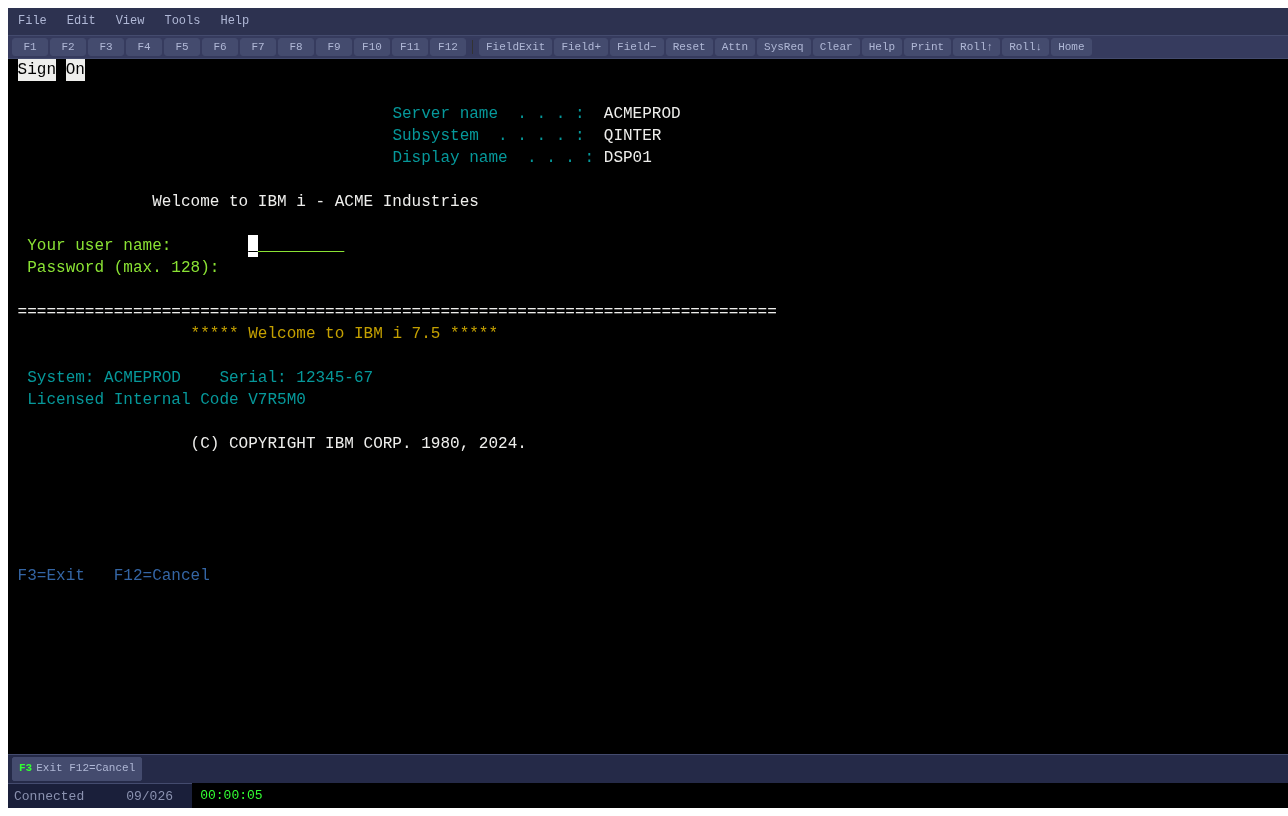
Sign on and navigate to the main menu:
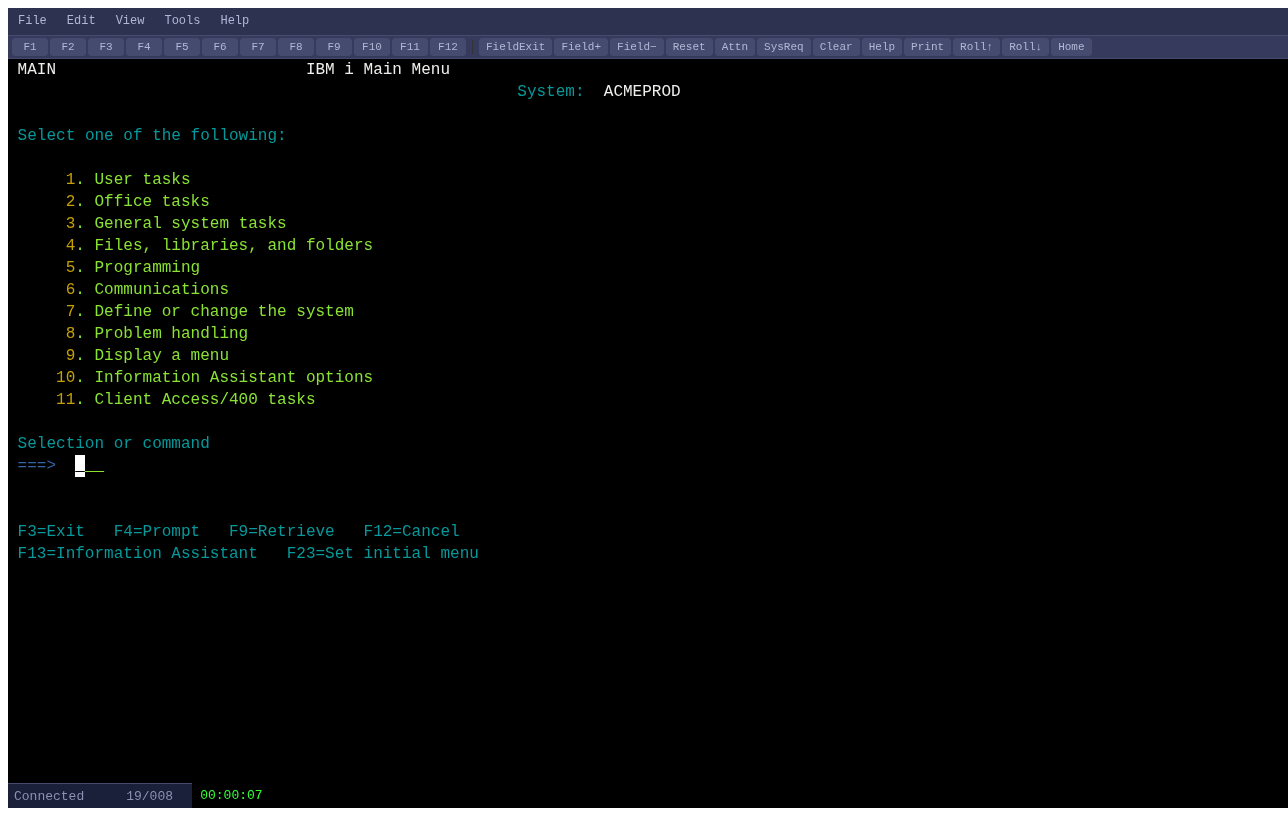
If you see garbled characters on a Hebrew AS/400, check the CCSID setting in your connection profile (CP424 for Hebrew New, CP803 for Hebrew Old).
Verification Checklist
- [ ]
imterm --versionshows v2.0.1 - [ ] Browser connects to login page
- [ ] Admin login works
- [ ] Terminal session connects and displays correctly
- [ ] Audit log is being written at
/var/lib/imterm/audit.jsonl - [ ] systemd service restarts on failure (
systemctl kill imtermthen checksystemctl status)
Next Steps
- SSO integration - Connect IMTerm to your Active Directory via LDAP or Kerberos SPNEGO. See Article 7: SSO and Kerberos Setup Guide.
- Hebrew / BiDi - If your AS/400 uses Hebrew, see Article 3: Hebrew and BiDi Setup Guide.
- Enterprise printing - Set up SCS-to-PDF print sessions. See Article 6: Enterprise Printing.
- Multi-server deployment - Scale to 2000+ concurrent sessions. See Article 9: Multi-Server Deployment.
- Screen modernization - Turn green screens into web forms instantly. See Article 4: Screen-to-HTML Modernization.